Power Plant
| Power Plant | |
|---|---|

| |
| Max. Tier | 6 |
| Conversion rate | 800:1 |
| Color theme | Yellow |

The Power Plant is a building used to generate electricity to give speed boosts to other buildings.

Contents
Power Grid
The power grid is where you place components in order to generate and store energy.
You can place components by selecting one from the list on the left of the screen, and then clicking an empty tile. The price of the placed component will increase by 1.5x (mul.) for each component of the same type on the grid, this is reverted if the component is sold.
To sell a component, right-click the filled tile while not having any component selected from the list. Doing so will fully refund the resources you spent buying the component.
Components must connect either orthogonally to a component they supply something to or via pipes if the component provides a fluid can be transported by one. Generators do not need to be connected to a battery, all battery storage and power production is simply added together for their final values.
Network
This is where you spend your energy to speed up other buildings:
- Construction Firm: Reduces construction time for buildings.
- Factory: Speeds up shard refining, store reload, machine speed, and fabricator speed.
- Mine: Speeds up the drill, asteroid mining time, and asteroid scanning time.
- Headquarters: Speeds up download of software and how fast contracts run out.
- Shipyard: Speeds up shipments.
- Museum: speeds up artifact research time and offshore market refresh time.
- Arcade: On its own, it only speeds up the cooldown timer of "Refresh Wheel." To effectively boost the arcade you need to have something else (located in the spoiler below), which reduces the time between delays (such as time between stopping jumble rows) and increases the speed of the lucky wheel.
- Trading Post: reduces the time between perk refreshes and the timer to reset trades
- Power Plant: Requires the Recursive Feedback exotic skill. Speeds up the speed of the power grid and power timers.
The more energy you use, the longer and stronger the boost is.
You can boost multiple buildings at the same time, but if they are boosted at exactly the same time then they have to split the energy for the boost, and so the boosts will be weaker. If you are using workers to restart boosts this isn't a problem in practice, because the periods of each building are different, and so each building will end up boosted at a unique time.
Mechanics
Boosting applies a percentage of the total available energy (10%, 25%, 50% or 100% depending on your selection) towards boosting. If there are multiple buildings being boosted simultaneously, the energy is split between them. (This splitting will not be shown in the preview numbers before you boost, but it will be apparent afterwards.) Call this energy being allocated to boosting a building BoostEnergy.
Then BoostEnergy is divided between time and effectiveness based on the position of the slider. For effectiveness, the slider runs from 1% to 100% of BoostEnergy, and for time the slider runs from 100% to 1%. This does mean that the overall energy sums to 101%! Call the amount after the the slider PostSlider.
For both time and effectiveness, PostSlider is used as follows: Result = log(PostSlider) * Perks * BaseValue. When displayed, Result is rounded for effectiveness, but truncated for time. The base for the log is 10 normally, or 7 with the Super Boost skill. Perks include Town Perks, as well as the 1.25 multiplier from Max Power if at full power (only applies to effectiveness). The table of BaseValues is:
| Building | Time | Effectiveness |
|---|---|---|
| Construction Firm | 4:00 | 20% |
| Factory | 3:00 | 15% |
| Mine | 3:20 | 18% |
| Headquarters | 2:00 | 22% |
| Shipyard | 5:00 | 10% |
| Museum | 3:00 | 15% |
| Workshop | 3:40 | 21% |
| Arcade | 5:00 | 0.5% |
| Trading Post | 3:00 | 15% |
| Power Plant | 2:15 | 7.5% |
Technology
These are your components for use in the power grid.
You can unlock more by upgrading the Power Plant in the Construction Firm and purchasing the technology level it unlocks.
All components except the water pump and dyson node can be upgraded in the technology tab. All costs are rounded to the nearest resource. The power plant runs at 10 ticks/sec.
Basic
| Component | Upgrades | |||||
|---|---|---|---|---|---|---|
| Icon | Description | Base Cost | Name | Description | Cost | Max Level |
 Water Pump |
Provides infinite water. | 25 |
None | |||
| Transports 1,000L of gas or fluid per tick.
Currently used to move water from a water pump to a coal boiler, and to move steam from a coal boiler to a steam turbine. The pipe is gray when empty, blue when filled with water, and white when filled with steam. |
5 |
Pipe Throughput | +1,000 to pipe input, output and storage (add.) | ??? | 9 | |
| Adds +2,000 power capacity.
Can be placed anywhere, and is not needed to be connected to anything. |
50 |
Capacity | +50% battery capacity | ??? | 15 | |
| Deep Link | +1% total power capacity per Yellow battery (add.)
Note that the Total Capacity bonus applies to all batteries, as well as the base 1,000 power! I.e. if you have fully upgraded Yellow Batteries and have 10 of them, they're providing +50% to all capacities. |
??? | 5 | |||


Tier 1
| Component | Upgrades | |||||
|---|---|---|---|---|---|---|
| Icon | Description | Base Cost | Name | Description | Cost | Max Level |
| Transforms 10L of steam into 30 power per tick.
Needs to be connected to an active coal boiler to generate energy. |
60 |
Condensed turbines | +100% power production (mult.) and
steam usage/tick |
5,000 × 3lvl |
6 | |
| Two-flow rotors | -1 base steam usage/tick | 10 M (1e7) × 16lvl |
6 | |||
| Provides 2,500kg of coal.
Needs to be placed next to a coal boiler. Has to be replaced periodically, as it will run out of coal. |
40 |
Storage | +25% Coal (mul.) | 25,000 * 3lvl |
30 | |
| Turns 100L of water, and 4 kg of coal into 30L of steam.
Needs to be connected to a water pump and a coal chest to function. |
150 |
Denser coal | +30L steam/tick,
+4kg coal usage/tick and +100L water usege/tick |
??? |
9 | |


Tier 2
| Component | Upgrades | |||||
|---|---|---|---|---|---|---|
| Icon | Description | Base Cost | Name | Description | Cost | Max Level |
| Provides 10,000L of oil.
Can be placed anywhere, as long as a fluid pipe connects it to an oil furnace. |
1,000 |
Storage | +20% Oil (mul.) | 100,000 * 3lvl |
30 | |
| Provides 20,000L of gas.
Can be placed anywhere, as long as fluid pipes connect it to a gas turbine. |
2,000 |
Storage | +20% Gas (mul.) | 125,000 * 3lvl |
30 | |
| Turns 20L of oil and 200L of water into 100L of steam. | 17,500 |
Bigger heat chambers | +100L steam/tick,
+20L oil usage and +200L water useage/tick |
??? |
9 | |
| Turns 25L of gas into 100 power per tick. | 5,000 |
Early ignition | +100% power production and gas requirement | ??? |
5 | |
| Optimized pipes | +1% power production (mul.) for gas turbines per regular pipe on the grid regardless if it's in use | ??? |
2 | |||


Tier 3
| Component | Upgrades | |||||
|---|---|---|---|---|---|---|
| Icon | Description | Base Cost | Name | Description | Cost | Max Level |
| Produces 1 power per tick (0 when raining). | 10,000 |
Double sized panels | +100% power production | ??? |
10 | |
| Aqua panels | 2% × lvl of power production well continue during rain | ??? |
5 | |||
| Uses 20L of water to provide 3 power per tick.
Can be connected with pipes or directly to a Water Pump |
20,000 |
Streamlined turbines | +100% power production (mul.) and +20L water usage | ??? |
9 | |
| Produces 0~4 power per tick
(min. of 0 without wind and max of 4 when there is a hurricane). |
12,500 |
Extra long blades | +100% power production | ??? |
10 | |
| Titanium rotors | 8x power generation during hurricanes | ??? |
1 | |||
| Gives +25,000 to power capacity. | 2,000 |
Capacity | +100% power capacity | ??? |
4 | |
| Deep link | +1% power capacity per component that processes resources and/or
produces power times the number of red batteries (add.) |
??? |
3 | |||


Tier 4
| Component | Upgrades | |||||
|---|---|---|---|---|---|---|
| Icon | Description | Base Cost | Name | Description | Cost | Max Level |
| Provides 10 M (1e7)L of lava.
Lava can be moved with a fluid pipe. |
25,000 |
Storage | +15% Lava (mul.) | 1.5 M (1.5e6) * 3lvl |
30 | |
| Turns 100L of lava and 100L of water into 200 power per tick.
Can be connected with a pipe or directly to a lava pump. |
50,000 |
Turbine overheating | +100% power production (mul.),
+100L water and lava usage/tick |
??? |
4 | |


Tier 5
| Component | Upgrades | |||||
|---|---|---|---|---|---|---|
| Icon | Description | Base Cost | Name | Description | Cost | Max Level |
| Provides 50,000Kg of Uranium. | 75,000 |
Storage | +10% Uranium (mul.) | 5 M (5e6) * 3lvl |
30 | |
| Transforms 1Kg of Uranium and 100L of water into 200L of steam. | 100,000 |
High Radiation | +100% steam production (mul.)
+100% water and uranium requirement (mul.) |
??? |
5 | |
| Gives +500,000 to power capacity. | 50,000 |
Deep link | +1% total power capacity per component on the grid that emits resources
(including storage) times the number of blue batteries (add.) |
??? |
4 | |


Tier 6
| Component | Upgrades | |||||
|---|---|---|---|---|---|---|
| Icon | Description | Base Cost | Name | Description | Cost | Max Level |
| Transport 1,000L of Plasma per tick | 100,000 |
Plasma Throughput | +1000 Plasma input/output/storage (add.) | 1 Qa (1e15) * 1,000lvl |
9 | |
| Provides 100,000L of He3 | 500,000 |
Storage | +8% Gas (mul.) | 25 M (2.5e7) * 3lvl |
30 | |
| Transforms 250L of He3 into 500L of Plasma | 1.75 M (1.75e6) |
Cold Fusion | +500L Plasma Production (add.),
+250L Helium Requirement (add.) |
100 T (1e14) * 100lvl |
9 | |
| Transform 100L of Plasma into 5,000 power per tick | 500,000 |
Plasma Synergy | +2% [plasma] Power Production (mul.) for every component on the grid that is not a plasma turbine regardless if it's in use,
+300L Plasma Requirement (add.)
|
10 Qa (1e16) * 100 M (1e8)lvl |
3 | |
| Water Synergy | +18% Plasma Turbine Power Production (add./mul.) for every water turbine on the grid regardless if it's in use, +80% Water Turbine Power Production (add.) for every plasma turbine on the grid regardless if it's in use
(Note: The +18% bonus is additive with increasing levels, and also additive with number of components. I.e. at 5/5 levels it is a +90% bonus per water turbine. This applies independently/in addition to Plasma Synergy.) |
1 Qi (1e18) * 1 M (1e6)lvl |
5 | |||
| Solar Synergy | +10% Plasma Turbine Power Production (add./mul.) for every solar panel on the grid regardless if it's in use,
+50% Solar Panel Power Production (add.) for every plasma turbine on the grid regardless if it's in use (Note: The +10% bonus is additive with increasing levels, and also additive with number of components. I.e. at 5/5 levels it is a +50% bonus per solar panel. This applies independently/in addition to Plasma Synergy.) |
1 Qi (1e18) * 1 M (1e6)lvl |
5 | |||
| Wind Synergy | +10% Plasma Turbine Power Production (add./mul.) for every wind turbine on the grid regardless if it's in use, +50% Wind Turbine Power Production (add.) for every plasma turbine on the grid regardless if it's in use
(Note: The +10% bonus is additive with increasing levels, and also additive with number of components. I.e. at 5/5 levels it is a +50% bonus per wind turbine. This applies independently/in addition to Plasma Synergy.) |
1 Qi (1e18) * 1 M (1e6)lvl |
5 | |||


Special
| Component | Upgrades | ||
|---|---|---|---|
| Icon | Description | Base Cost | |
| Provides aura and +X Power / Tick (depends on dyson power)
Dyson nodes cannot be placed in the 8 squares next to another node. Available as soon as Floor 2 is unlocked, regardless of Power Plant level. Power amount is |
1 T (1e12) |
None | |

Skills
- See also: Skills (Upgrade)
- Quantum Grid - Allows components on the power grid to connect to components on the opposite edge of the grid.
- Super Boost - Using more power for boosts has a higher impact on duration/effectivity. (Log10 -> Log7)
- Max. Power - Increases the effectiveness of all active boosts by 25% (multiplicative) if the current amount of power exceeds the maximum amount.
- Efficient Recycling - Lowers the base conversion rate from town resources to power plant resources to 600.
- Shutdown - Allows you to cancel boosts anytime. Does not refund any power!
- Yellowprints - Unlocks the ability to store up to 3 different layouts of the power plant as well as the functionality to import, export and apply them at any time. Additionally adds the an option to sell the entire grid.
Exotic Skills
- See also: Exotic Skills
- Hibernation Mode (50
 ) - Boosts stop losing their duration while the game is closed but still affect all buildings during that time as many they would normally do.
 - Recursive Feedback (100 ) - Allows the power plant to boost itself. Power will charge correspondingly faster, although the power grid continues to tick at its regular speed. All other processes within the Power Plant are accelerated, just like in other buildings.
- Quantum Storage (200 ) - Enables charging beyond you max power at a reduced efficiency. Each order of magnitude (10x increase) in max power grants an additional 1% of your base charging rate during overcharge.
Tips and Tricks
Recommended Setups
- Starter Power Plant Setup [1]
Yellowprint Cost 182,300 
Requirements Fully upgraded components via Technology tab. Power Capacity 3.023 M (3.023e6) Average Power Production 132,600/sec Import Code tZBBCsJADEWv4gm8wOxcCO4KeoG0Rh1IkzDNMMztla4M0jJI+1bJ/+GHRKVgUgK2IwncJVu48CNytHro XjBh2JmKRFJOYIaphskQxltOfWT803I4R6Nik7J1xCBAV5MET5zrc04MAy7qBT5ndXlUp/5Ero+3LHU0 37b87g0ivLPWffMG
Preview 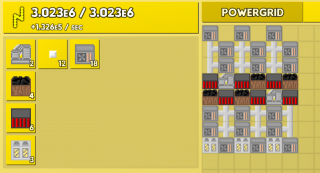
- Mid-game Power Plant Setup [2] (Outdated, use lategame setup for now)
- Recommended
Yellowprint Cost 4 Sp (4e24)
Requirements Power Plant Floor 2. 2 levels of each plasma turbine upgrade in Technology tab. Power Capacity 69.35 B (6.935e10) Average Power Production ??? Import Code 7ZW/DsIgEMbfyMWxm4urUV/gKlcluR4Nf9Lw9nZpIh1aaIrW6sR3BO6+30GgUS3qhoDtjhQI5WwhuZIsrS8qZ6TiM8LNKj0aeSRS7QGsRe2/Jorn2x57jr6sieGznSjJYZ8jRsc7aqEbrk6XkjFhW6qhd4HH6AA5R4ExIOGN4iMyatgk7YCv+wlMDX35cOkDSbp6f+k03JfzlgV44DUECSFHT1ij6FNOyiywKQYSbu58ykkZIC6ae e6j9MdLwJMsVkWXIzKKQJ+AkQLel+k1uf2JDjwB
Preview 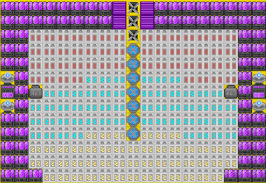
- Cheaper
Yellowprint Cost 3 Qi (3e18)
Requirements Power Plant Floor 2. 1 of each plasma turbine upgrade in Technology tab. Power Capacity 2.32 T (2.32e12) Average Power Production ??? Import Code 7ZbLDsIgEEX/yI1Ldm7cGvUHpjJVEjo0PEL4e+uiSWliA30k1nY3cAfunCEEauVR1xLIHqQCrpxlgkpBwgbGg1F0RkINVmnWZJkK7k4XgrAvFtLhCaxFHb7GXhBvlxslQV+AUDIPjZoz39kmxTYHIxZLZ4SiK8Ljo71QClcdb00MzzTrFOJuzlzIvVJjjsnnOIU2LmUu3sSjj83/CzV22yqpRt6m5YTLQI4sZufb+dbKF1BK5dvMJUapzMtXEpv3npotNWL8H2qNnRj/txoUh27V744yCN8=
Preview 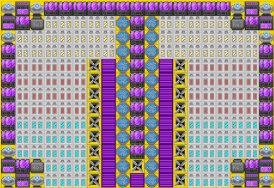
- No-Dyson
Yellowprint Cost 4 Sp (4e24)
Requirements 2 levels of each plasma turbine upgrade in Technology tab. Power Capacity 1.873 T (1.873e12) Average Power Production ??? Import Code 7ZbBDoIwDIbfyItHbjyBUV+gSNUlZSVjy8Lby4WEmaBsrOiBE38zUv6Pdltb9mhaAm0PxFCzs0VZ3F2nWJ8RbpZNRNQxgTmBRtpYphrukYh9Cdai6TNFw8/sGrg6UymNqUBhEgmbFTnMobN0gHxVYrHCAoT+nkjKNcfLoOHxvjhb/kwZDdajx68yFtrD8Bg/FASho/n3Qq9L88UwSZOmESzN90+kH2xu0p17UfeNutU57JWuf9jqMpftFCpWy9+48rPVGn75ASt1Jl1DlUsnen8B
Preview 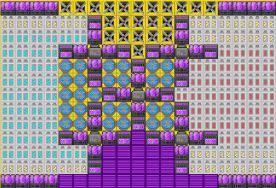
- Recommended
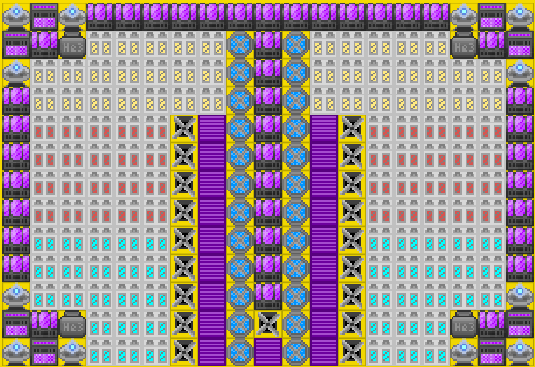
- Late-game Power Plant Setup [3]
Yellowprint Cost 3 QiD (3e48)
Requirements Electricity Infinity Perk enabled. Power Plant Floor 2. Fully upgraded components via Technology tab. Power Capacity 88.824 T (8.882e13) Average Power Production 21.485 Qa/sec (2.149e16/sec) (after max capacity) Import Code 5ZbBDoIwDIbfyItHbl68GvUFiiu6ZHSk20J4e/FgMpagDBgEvXXp1v1furWtdI1cKSC7UxqEdjaTVEiStslEYzQdkZDBas 7aXaaEq+NcEobOWpJ4u/psoxXwCQiVb6Y9GcPQdRbOSE1nhNvL90AlXbm/tDbcJwkFizxgMZo+UNrFGJxDRnEA 2wpqEvHNRN6jM83rnIyWIN3rofmhVkNOjtZzQXLgJcG8T/QPuIuCfahEP/AtIzroRmttRP8MOm+uHG6ih/pCA4aR+ Y2r1vEv9nucAWIiMpto9B1pzjz3PgE=
Preview 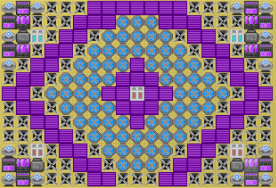


References
- Discord: Early Power Plant Setup
- Discord: Power plant guide v5
- Discord: MT15 Power Plant (Post Electric Stone)