Difference between revisions of "Mine"
(→About: Lots of rewording, changing structure, and all that.) |
(→About: Added factory link and skills section) |
||
| Line 19: | Line 19: | ||
There are upgrades that can help with drilling: | There are upgrades that can help with drilling: | ||
| − | * '''DRILLPOWER:''' How fast the drill digs down. | + | *'''DRILLPOWER:''' How fast the drill digs down. |
| − | * '''TANKVOLUME:''' How long the drill can run for without refueling. Increases the cost to fill the fuel tank. | + | *'''TANKVOLUME:''' How long the drill can run for without refueling. Increases the cost to fill the fuel tank. |
| − | * '''USAGE:''' How much fuel is used per second. | + | *'''USAGE:''' How much fuel is used per second. |
==Layers== | ==Layers== | ||
| Line 35: | Line 35: | ||
To the right of the layers are information boxes about the resource in the mine: | To the right of the layers are information boxes about the resource in the mine: | ||
| − | * '''Tile percentages:''' General information on what each tile gives and their chances of happening. | + | *'''Tile percentages:''' General information on what each tile gives and their chances of happening. |
| − | * '''Dig cost:''' The amount of oranges required to dig one tile of that resource type. | + | *'''Dig cost:''' The amount of oranges required to dig one tile of that resource type. |
| − | * '''Shard production:''' How many shards of that resource are produced by the mine every second. | + | *'''Shard production:''' How many shards of that resource are produced by the mine every second. |
| − | * '''Conversion rate:''' How many shards are required to generate one of that resource type. | + | *'''Conversion rate:''' How many shards are required to generate one of that resource type. |
| − | === Tile percentages === | + | ===Tile percentages=== |
'''Global rewards (What every resource layer gives):''' | '''Global rewards (What every resource layer gives):''' | ||
| − | * White resources | + | *White resources |
| − | * Gems | + | *Gems |
| − | * Digging cost | + | *Digging cost |
| − | * Empty tile | + | *Empty tile |
'''Resource specific rewards (Rewards that change to match the specific resource of the layer):''' | '''Resource specific rewards (Rewards that change to match the specific resource of the layer):''' | ||
| − | * Shards | + | *Shards (Used in the [[factory]] to create clumps) |
| − | * Shard conversion rate | + | *Shard conversion rate |
| − | * Shard production | + | *Shard production |
The bottom of the screen shows your shard amount, and a button that shows how much resources you will collect from the shards if pressed. | The bottom of the screen shows your shard amount, and a button that shows how much resources you will collect from the shards if pressed. | ||
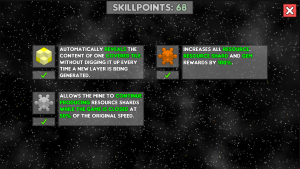
| + | == Skills == | ||
| + | [[File:Mine skils.PNG|thumb]] | ||
| + | |||
| + | == Exotic skills == | ||
{{PerfectNavigation}} | {{PerfectNavigation}} | ||
[[Category:Buildings]] | [[Category:Buildings]] | ||
Revision as of 21:51, 22 November 2019
| Mine | |
|---|---|

| |
| Max. Tier | 10 |
| Conversion rate | 120:1 |
| Color theme | Orange |
first test working on a wiki. will edit this page
Contents
About
The Mine is the place where we are going deep.
The Mine is the place where you´ll get much needed resources of all types. The deeper you dig, the more you get (until you hit a maximum).
This is the place you´ll want to visit after a tier-up of your modules in order to get quickly back into the game which makes it a very useful early game building but also, the more time and resources you invest into it the better it gets late game where you are going to need the shards that it produces to fuel your factory.
Drilling
Drilling is situated on the left side of the screen.
(Picture: mine overview drilling circled)
In order to run the drill, first add fuel and then hit the "DRILL" button. When drilling, the button changes into a stop button, which can be pressed to stop drilling. Adding more fuel is possible while the drill is running, but only after at least 10L of fuel has been used up to prevent orange resource loss from spamming refuel.
There are upgrades that can help with drilling:
- DRILLPOWER: How fast the drill digs down.
- TANKVOLUME: How long the drill can run for without refueling. Increases the cost to fill the fuel tank.
- USAGE: How much fuel is used per second.
Layers
In the middle of the screen are the layers situated.
Clicking uncovered tiles digs up any resources in the tile. Digging up tiles takes up orange resources.
The colored shards at the top of the screen changes which resources are found in the layer. The arrows show more shards to choose from.
The new layer button resets the layer by replacing all tiles with uncovered tiles. Using a new layer reduces the new layer pool, which has a cooldown to replenish new layers. When the new layer pool is empty, the layer can NOT be reset. Each resource has their own new layer pools.
Layer information
To the right of the layers are information boxes about the resource in the mine:
- Tile percentages: General information on what each tile gives and their chances of happening.
- Dig cost: The amount of oranges required to dig one tile of that resource type.
- Shard production: How many shards of that resource are produced by the mine every second.
- Conversion rate: How many shards are required to generate one of that resource type.
Tile percentages
Global rewards (What every resource layer gives):
- White resources
- Gems
- Digging cost
- Empty tile
Resource specific rewards (Rewards that change to match the specific resource of the layer):
- Shards (Used in the factory to create clumps)
- Shard conversion rate
- Shard production
The bottom of the screen shows your shard amount, and a button that shows how much resources you will collect from the shards if pressed.
