Infinity
| Spoiler warning! This article contains spoilers about Infinity content. |
![]() Infinity is a phase of the game which opens up at Military Tier 12. Infinity begins when the player reaches Era 100B in endless mode on any difficulty of a given region.
Infinity is a phase of the game which opens up at Military Tier 12. Infinity begins when the player reaches Era 100B in endless mode on any difficulty of a given region.
Contents
Early Infinity
Upon entering Infinity phase, you gain access to another tab in the second floor of the Workshop. A new section on the left has been unlocked here called Infinity Modules. Buying all of these new modules is your first goal in the Infinity phase. You can obtain them all pretty easily if you focus on farming late Era waves, even on Forest/Easy.
Era 1 Completion
For a reliable income at this point, you should play the map Neutral/Nightmare (R11) at Wave 90B Era 90B. You can achieve this by clearing the map, unlocking Infinity 1, then restarting with Critical Wavejump active and disabling software at the required Wave and Era. When your modules are sufficiently powered up, you should focus on reaching Era 1 on every region and difficulty to strengthen the Wave Marathon and Wave Horizon software. This is quite a task to take on but once you get rolling, it gets faster and faster. The first 30 completions are quite a grind but since the Wave Acceleration Factor increases you get from Wave Horizon are multiplicative, it gets exponentially faster, the closer you get to completing all 90/90 modes. This means beating every difficulty in every region. This is a really important step to complete since reaching Infinity 1 takes many hours each and taking care of this early will help with all your future goals. Since Military Tier 13 & 14 do not unlock any software that helps you reach Era 1 faster, you may as well get this out of the way now before attempting to reach MT13. Once you reach Era 1 on all 90/90 modes, move on to the next section to do the same for Infinity 1.
Infinity 1 Completion
You should now be capable of reaching Infinity 1 on any map easily and raising your Military Tier. You do not need to max out the Era HP divider to Infinity anymore but you will still need to max out the Era DMG divider. First complete R1 to R3 on Easy to reach MT13, then complete R4 to R9 and R11 on Easy to reach MT14. At this point you have to do similar grinding like the previous section, for reaching Infinity 1 on all 90/90 modes. This powers up your new software Wave Floor, Era Floor and Era Horizon which are unlocked at MT14. If you are wanting to push your economy further when you get to MT14, you should attempt to reach Infinity 1 on Chaos/Impossible (R15). If you cannot survive up to Wave 90B Era 90B, keep farming Neutral/Nightmare.
Surviving Era DMG Red Skull: Make a build comprising of as many block and attack slowing modules and as you can fit, blocks deny 100% of damage so it makes the Era DMG multiplier not affect you. While the Era DMG has a red skull, your percent resistances do nothing (with the exception of Temporal Barrier). You should not need Infinity Foundation because you're facing Era enemies.
Penetrating Era HP Red Skull: There are many Infinity modules that do instant kills or Infinity damage which bypasses the Era HP multiplier. The best of which is Infinity Splash (see next section).
Infinity Modules & Mechanics Explained
For this section we should understand some new terminology. All damage until now can be categorised as Era damage. This includes the damage we do as well as the damage we take. When you progress into Infinity 1, all enemies become basically immune to Era damage and also deal Infinity damage. Therefore you will need to use Infinity modules to survive and kill enemies in Infinity 1 and onwards. When using modules to deal Infinity damage, you can ignore the Era HP multiplier and not purchase any HP dividers. Enemies get increased stats for each Infinity wave, unlike Era waves. Infinity enemies scale with the following formula; Base * (Infinity Wave + 1). For example; Infinity 1 enemies have 2x the stats of Era enemies. Infinity 9 enemies have 10x the stats of Era enemies.
Infinity Foundation: Makes it so Infinity damage doesn't instantly kill you. It also nerfs your health, shield and regeneration.
Infinity Shield: If you are using a shield module, this module will revert some of the nerfs from Infinity Foundation.
Infinity Attack: The damage on this module is so awful that it will quickly become useless with Wave Streaming enabled. Avoid using this.
Infinity Splash: This module deals 30% of your Era damage as Infinity damage, converting it to Neutral as well. This is the only good source of Infinity damage early on, so you'll want to maximize your Neutral boost in the museum to make the most of this module. Note that adding this module will bypass the Era HP multiplier.
Blueprints
| Recommended Build and AI |
|---|
| This is a blueprint originally made by @Connecting on the fire sword studios discord, and modified by @coco to be more efficient. Works with t32-42 mods, and recommended disable order is electric>universal>darkness>light>water(disable era dmg shield after the 1st disable, then move down the order normally). DO NOT BUFF HP IN TRADING POST, YOU MAY DIE.
ZG9kZ2Vjb2luIHN1cHJlbWUgdjI7ZW5lcmd5LnJlZ2VuZXJhdGlvbjtlbmVyZ3kuYmFzaWM7eHAuYm9udXM7Ym9udXMuY29uZGVuc2U7ZW5lcmd5LnJlY3ljbGluZztlbmVyZ3kuc3VuO3NwZWxsLnJlZnJlc2g7ZW5lcmd5LmZsb3c7YXR0YWNrLnNwZ WVkO2F0dGFjay5tdWx0aXNob3Q7YXR0YWNrLmJvdW5jZTthdHRhY2suYm91bmNlLnBob2VuaXg7YXR0YWNrLmJvdW5jZS5nYWlhO2VsZWN0cmljaXR5LnJlbGF5O3NwbGFzaC5haXI7YXR0YWNrLnJhcGlkZmlyZTtpbmZpbml0eS5hdHRhY2suc3BlZW Q7aW5maW5pdHkuc3BsYXNoO3NhY3JpZmljZS5kYXJrO3NwZWxsLm11bHRpc2hvdDthdHRhY2suYmFzaDthdHRhY2suc3Bhcms7YmxvY2suZWFydGg7YmxvY2suZmlyZTtibG9jay53YXRlcjtibG9jay5haXI7YmxvY2submF0dXJlO2Jsb2NrLmxpZ2h 0O2Jsb2NrLmRhcmtuZXNzO2Jsb2NrLmVsZWN0cmljaXR5O2F1cmEuZnJvc3Q7c2hpZWxkLmZyb3N0O2RlZmVuc2UuZGFpZ29wYXJyeTthdXJhLmRlYXRoO2V2YXNpb24uYmFzaWM7ZGVmZW5zZS5kZWZpYW5jZTtkZWZlbnNlLnNoZWx0ZXI7ZGVmZW5z ZS5zdHJpa2ViYWNrO2JhcnJpZXIudGVtcG9yYWw7c2hpZWxkLmFkdmFuY2VkO2Fpci5odXJyaWNhbmU7dG93ZXIuc3VwZXIuMzt0b3dlci5zdXBlci4yO3Rvd2VyLnN1cGVyLjE7bXVsdGlzaG90LmZvY3VzZWQ7ZGVmZW5zZS5zdG9uZXNraW47c2hpZ WxkLnVuaXZlcnNhbDttaXNzaWxlLnNlcmlvdXM7aW5maW5pdHkucmFuZ2U7ZGVmZW5zZS5idWx3YXJrO2FtcGxpZmllci5uZXV0cmFs AI that limits d sac uses+cycles temp hull/barrier, and cycles the super tower modules. REQUIRES NECRONOMICON (artifact from boss 4). GGRhcmsgc2FjICsgcmVmcmVzaCBjeWNsZQEAAAAFa2V5LjIAAAAAEQAAABFnZW5lcmljLndhaXR1bnRpbBFjb21wYXJpc29uLmRvdWJsZQx0b3dlci5oZWFsdGgIY29uc3RhbnQBAAhjb25zdGFudAQCIT0IY29uc3RhbnQDAAAAAAAAAAAOZ2VuZXJpY y5nb3RvaWYIY29uc3RhbnQCBAAAABFjb21wYXJpc29uLmRvdWJsZQx0b3dlci5oZWFsdGgIY29uc3RhbnQBAQhjb25zdGFudAQCPD0IY29uc3RhbnQDUrgehetR4D8XdG93ZXIubW9kdWxlLnVzZWluc3RhbnQIY29uc3RhbnQCAQAAAA5nZW5lcmljLm dvdG9pZghjb25zdGFudAIPAAAAEWNvbXBhcmlzb24uZG91YmxlDHRvd2VyLmVuZXJneQhjb25zdGFudAEBCGNvbnN0YW50BAI8PQhjb25zdGFudANmZmZmZmbmPxd0b3dlci5tb2R1bGUudXNlaW5zdGFudAhjb25zdGFudAIDAAAAF3Rvd2VyLm1vZHV sZS51c2VpbnN0YW50CGNvbnN0YW50AgYAAAAXdG93ZXIubW9kdWxlLnVzZWluc3RhbnQIY29uc3RhbnQCBwAAABd0b3dlci5tb2R1bGUudXNlaW5zdGFudAhjb25zdGFudAIIAAAAF3Rvd2VyLm1vZHVsZS51c2VpbnN0YW50CGNvbnN0YW50AgIAAAAX dG93ZXIubW9kdWxlLnVzZWluc3RhbnQIY29uc3RhbnQCBQAAAA5nZW5lcmljLmdvdG9pZghjb25zdGFudAIQAAAAEWNvbXBhcmlzb24uZG91YmxlFXRvd2VyLm1vZHVsZS5jb29sZG93bghjb25zdGFudAIHAAAACGNvbnN0YW50BAE8CGNvbnN0YW50A wAAAAAAgFZAF3Rvd2VyLm1vZHVsZS51c2VpbnN0YW50CGNvbnN0YW50AgkAAAAXdG93ZXIubW9kdWxlLnVzZWluc3RhbnQIY29uc3RhbnQCCgAAABd0b3dlci5tb2R1bGUudXNlaW5zdGFudAhjb25zdGFudAILAAAADGdlbmVyaWMuZ290bwhjb25zdG FudAIBAAAAF3Rvd2VyLm1vZHVsZS51c2VpbnN0YW50CGNvbnN0YW50AgQAAAAMZ2VuZXJpYy5nb3RvCGNvbnN0YW50AgEAAAA= |
Late Infinity
After you reach Infinity 1 on all maps (90/90), you should push to high Infinity. Infinity 1M is enough for your Infinity Stones to have a decent charge speed. To do that you need to increase your Wave Acceleration Factor for a few hours (based on your goal), then you push up through Infinity waves.
An infinity calculator made by Nesslow: https://tpt2-nesslow.netlify.app/inf_estimate_calc%20(wip)/infcalc
Infinity Stones
The Infinity Stones are a set of extremely powerful items that provide game-changing effects, and are the main focus of this phase. Your main objective is to charge each infinity stone, which simply takes time. When first accessing one of the stones, the times to charge it will be so large it is essentially impossible. However, these progress bars can be sped up in two ways: Increasing your infinity high scores for the provided regions, and purchasing Exotic Refinements (unlocked at MT13). Both are equally important, and Exotic Refinements are much more noticeable at lower infinities. They are permanent upgrades, meaning they are both worthwhile investments.
Collecting and Unlocking Stones
With the exception of Neutral being unlocked at 1m era, Infinity stones are collected by going to its respective region and killing a disabled enemy of that element while being at Infinity 1 or higher. The region where each element is found is very intuitive and I recommend guessing yourself.
| Locations to find Infinity Stones |
|---|
|
Earth: Underground Fire: Volcano Air: High Mountain Nature: Jungle Electric: Metallic Ruins Water: Ocean Darkness: Dark Realm Light: Heaven Universal: Universe |
Once they're collected they will show up in the infinity board with some conditions before you can upgrade them, these conditions only need to be met once and the stones unlocked forever. All stones have the conditions of prestiging their respective laboratory experiments 3 times and have 50 essence in the 3rd tab of the Era Workshop.
| Unique Condition to Unlock Infinity Stones | ||||||||||||||||||||
|---|---|---|---|---|---|---|---|---|---|---|---|---|---|---|---|---|---|---|---|---|
|
Neutral:
Earth:
Fire:
Air:
Nature:
Electric:
Water:
Darkness:
Light:
Universal:
|
Charging Stones
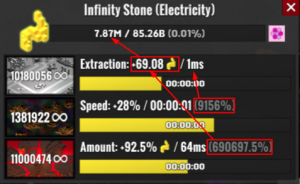
To charge a stone you will need to get a base value of 1 trillion (1e12) elemental energy, which can be reduced by purchasing the "Charge Required" exotic refinement. To get energy you have to wait for the top bar (charge) of the chosen stone to fill up, each time it fills you will get an amount of elemental energy which can be boosted by the bottom bar (production), the time it takes to charge can be reduced by the middle bar (speed)
the base time it takes for a bar to fill is equal to 8760 hours/sum of all your infinity highscores on the specific region for that bar, region depends on the stone and the bar
There are 6 exotic refinements:
| Exotic Refinements |
|---|
|
Charge Required - Reduces the amount of elemental energy needed to fully charge the stone Speed Bonus - Increases the amount of speed that is gained per bar completion Production Bonus - Increases the amount of energy that is gained per bar completion Charge Duration - Decreases the time it takes for the charge bar to fill Speed Duration - Decreases the time it takes for the speed bar to fill Production Duration - Decreases the time it takes for the production bar to fill |
Speed bonus and production bonus increase how much each fill of production and speed bar boosts the charge bar, but are linear in their scaling which makes them really bad beyond the first 10-20 upgrades.
The duration exotic refinements reduce the base fill time of each bar by a multiplier, these are the exotic refinements you should actually focus on
Infinity Perks
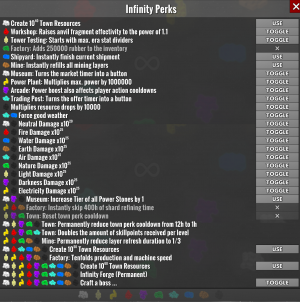
Once a stone is fully charged it can be used on an infinity perk and then need to be charged again. After being used the speed and amount bonus that were stockpiled get reset. The ones that are in bold are highly recommended.
| List of Infinity Perks |
|---|
Use Perks
These use up all the charge and puts the stones on charging to perform a 1 time use function. These perks can be used infinitely with a couple exceptions, they display an "X" on the button if wont do anything, for instance if you want to use the water stone to finish a shipment but you don't have a shipment currently in progress.
| List of Use perks |
|---|
|
Earth: Refreshes all layers in the Mine Water: Finishing the current shipment in the Shipyard Fire, Earth, Electric: skips 400 hours of Factory Refinement Nature, Light, Darkness: Resets the cooldown of town perk respec Nature: Gives 250k Rubber in the Factory Universal, Neutral, Darkness: Increases the tier of all Museum power stones by 1 (max of 50). Neutral: Gives 1e30 town resources. Neutral, Fire, Earth, Air, Water, Universal: Gives 1e45 town resources. All stones: Gives 1e60 town resources. |
Toggle Perks
When started, Toggle Perks doesn't use up the charge but it makes the stone not be able to be used on anything else. They last until you turn them off and then they will lose the charge and start recharging.
| List of Toggle perks |
|---|
|
Air: Turns the Trading Post trade refresh timer into a button. Neutral: Turns the Museum Offshore Market stock change timer into a button. Air, Water: Forces good weather, takes around 20 minutes for it to take effect. Electric: Multiplies the Powerplant's power capacity by 1 million Universal: Multiplies Resources dropped from enemies by 10k, does not affect transmute and wave resources. Universal, Any Element: Multiplies damage of that element by 1 trillion. Neutral, Fire, Earth, Water, Air, Nature: Temporarily grants access to Infinity Forge. |
Unlock Perks
Unlock perks use up the charge and put the stones on charging for a permanent buff.
| List of Unlock perks |
|---|
|
Fire, Earth, Electric, Universal, Darkness, Light: Multiplies processing speed of all machines in the factory (including belt) by 10. Fire, Electric, Air, Nature, Darkness: Makes you get 2 skill points per level, applies to levels gotten before unlocking this perk. Neutral, Light, Nature, Dark, Universal: Reduces the cooldown of respecing town perks to 1 hours instead of 12. Fire, Earth, Electric, Nature, Universal: Reduces the time it takes to generate a Mine layer to 1 minute instead of 3. All stones: Permanently grants access to Infinity Forge. |
Infinity Forge
The Infinity Forge is unlocked via infinity stones. It allows the player to edit the tier of any module (excluding infinity modules) for free.
| This article is a stub. The article does not cover enough information about the topic. You can help by expanding it. |


