Difference between revisions of "Desert"
Jump to navigation
Jump to search
(Replaced hardcoded PerfectNavigation NavBox with Template:PerfectNavigation NavBox) |
(Add image, modules) |
||
| Line 1: | Line 1: | ||
| − | The second region in the game, unlocked after completing wave 100 on [[Forest | + | [[File:Desert.png|thumb]] |
| + | The '''Desert''' is the second region in the game, unlocked after completing wave 100 on [[Forest]]. | ||
The Desert features a sandy wasteland filled with fossils and cacti. The region consists of 6 lanes that enemies may spawn from. | The Desert features a sandy wasteland filled with fossils and cacti. The region consists of 6 lanes that enemies may spawn from. | ||
| Line 5: | Line 6: | ||
==Enemies== | ==Enemies== | ||
The base enemy structure consists of: | The base enemy structure consists of: | ||
| − | + | * Neutral enemies | |
| − | *Neutral enemies | + | * Light enemies |
| − | *Light enemies | + | * Fire enemies |
| − | *Fire enemies | + | * Earth enemies |
| − | *Earth enemies | ||
== Environmental Effects == | == Environmental Effects == | ||
| Line 15: | Line 15: | ||
== Modules == | == Modules == | ||
| − | + | {{See also|Modules}} | |
| − | = | + | {| class='wikitable sortable' |
| − | + | !Type!!Name!!Unlock Condition | |
| − | + | |- | |
| − | + | |[[File:Defensive Module.png|Defensive|center|30px]]||'''Simple Heal'''||Wave 1 | |
| − | + | |- | |
| + | |[[File:Utility Module.png|Utility|center|30px]]||'''Energy'''||Wave 1 | ||
| + | |- | ||
| + | |[[File:Utility Module.png|Utility|center|30px]]||'''Energy Regeneration'''||Wave 1 | ||
| + | |- | ||
| + | |[[File:Defensive Module.png|Defensive|center|30px]]||'''Granite Foundation'''||Wave 10 | ||
| + | |- | ||
| + | |[[File:Offensive Module.png|Offensive|center|30px]]||'''Light Attack'''||Random 5% | ||
| + | |- | ||
| + | |[[File:Offensive Module.png|Offensive|center|30px]]||'''Light Burst'''||Random 2% | ||
| + | |- | ||
| + | |[[File:Offensive Module.png|Offensive|center|30px]]||'''Air Attack'''||Random 5% | ||
| + | |- | ||
| + | |[[File:Offensive Module.png|Offensive|center|30px]]||'''Air Burst'''||Random 2% | ||
| + | |- | ||
| + | |[[File:Offensive Module.png|Offensive|center|30px]]||'''Electricity Attack'''||Random 5% | ||
| + | |- | ||
| + | |[[File:Offensive Module.png|Offensive|center|30px]]||'''Electricity Burst'''||Random 2% | ||
| + | |- | ||
| + | |[[File:Defensive Module.png|Defensive|center|30px]]||'''Light Resistance'''||Random 5% | ||
| + | |- | ||
| + | |[[File:Defensive Module.png|Defensive|center|30px]]||'''Air Resistance'''||Random 5% | ||
| + | |- | ||
| + | |[[File:Defensive Module.png|Defensive|center|30px]]||'''Electricity Resistance'''||Random 5% | ||
| + | |} | ||
== Town Assets == | == Town Assets == | ||
After completing wave 100, you unlock: | After completing wave 100, you unlock: | ||
| − | |||
* Cactus | * Cactus | ||
* Fossil | * Fossil | ||
* Sand Rocks | * Sand Rocks | ||
| + | |||
{{PerfectNavigation}} | {{PerfectNavigation}} | ||
[[Category:Regions]] | [[Category:Regions]] | ||
Revision as of 03:51, 24 February 2021
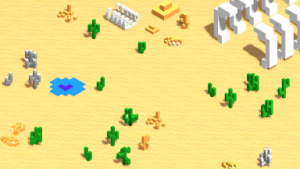
The Desert is the second region in the game, unlocked after completing wave 100 on Forest.
The Desert features a sandy wasteland filled with fossils and cacti. The region consists of 6 lanes that enemies may spawn from.
Enemies
The base enemy structure consists of:
- Neutral enemies
- Light enemies
- Fire enemies
- Earth enemies
Environmental Effects
This area has no environmental effects.
Modules
- See also: Modules
| Type | Name | Unlock Condition |
|---|---|---|
| Simple Heal | Wave 1 | |
| Energy | Wave 1 | |
| Energy Regeneration | Wave 1 | |
| Granite Foundation | Wave 10 | |
| Light Attack | Random 5% | |
| Light Burst | Random 2% | |
| Air Attack | Random 5% | |
| Air Burst | Random 2% | |
| Electricity Attack | Random 5% | |
| Electricity Burst | Random 2% | |
| Light Resistance | Random 5% | |
| Air Resistance | Random 5% | |
| Electricity Resistance | Random 5% |
Town Assets
After completing wave 100, you unlock:
- Cactus
- Fossil
- Sand Rocks
