Factory
| Factory | |
|---|---|

| |
| Max. Tier | 10 |
| Conversion rate | 150:1 |
| Color theme | Red |
The Factory is a building where you make production modules. Production modules produce a specific amount of resources per second.
To craft production modules you need to either purchase your materials or refine and combine your own with machinery.
You need materials from the Mine in order to refine better materials.
Contents
Upgrades
Upgrades to the factory increases inventory space, crafting grid space, and unlocks new recipes.
Main Screen
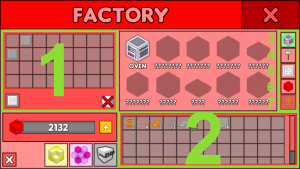
Inventory
Located on the bottom right. Things you buy and make can be placed here.
Click and drag the items to move them around, and into the crafting grid.
Right click with an empty mouse picks up half of the selected item. Right click with a full mouse places down one of the held items, holding right click with a full mouse and dragging places one item on each empty tile.
Clicking on the trash bin through it will delete the items you are holding.
Crafting Grid
Located on the left of the factory screen
You can display recipes here from the recipes list, items needed are represented by transparent icons, you can fill them in by dragging the items in from your inventory.
Machines
Machines are used to process items into different items, which can find them in the recipe list.
When a machine is producing, right clicking the machine removes one of the items, and shift right clicking removes all items at once from the machine.
Speed is calculated by this formula:
(Base x 2^(Tier-1))
With Base being the processing speed of that specific item.
| Tier | Boost |
|---|---|
| 1 | 1x |
| 2 | 2x |
| 3 | 4x |
| 4 | 8x |
| 5 | 16x |
| 6 | 32x |
| 7 | 64x |
| 8 | 128x |
| 9 | 256x |
| 10 | 512x |
Oven
The oven is used to turn ore and dust into ingots.
Note: It is not advised to turn ore directly into ingots, and instead crush it first into dust as this doubles your ingot output per ore.
Assembly
The assembly is used to turn cables into circuit wires.
Refiner
The refiner is used to turn ingots into cables, cables into wires, and plates into circuit plates.
Crusher
The crusher is used to turn ingots and ore into dust.
Cutter
The cutter is used to turn metal rods into bolts.
Presser
The presser is used to turn rubber balls and ingots into plates, and stacked plates into dense plates.
Mixer
The mixer is used to turn ore lumps into dust.
This allows you to combine lower tier dusts into a higher tier at a 1:8 ratio, or at a 1:4 ratio if the player has the Chemical Lumps Exotic Skill.
Belt
Belts do not make any items, instead they double your shard refining speed.
Shaper
The shaper turns ingots into metal rods, metal rods into nuts, and plates into pipes.
Boiler
The boiler turns blocks into dense blocks, and can also revert dust into a previous tier at a 1:4 ratio.
Recipes
The recipe tab is where you find all the machines, producers, and items you can't make with machines.
Clicking the cross-hair icon of a recipe adds transparent items onto the crafting grid as a guide for you to fill out, or press the auto-fill button to have it put the materials in for you.
Producers
The producer tab is where you install your producers.
Producers make various resources at a specific rate, and will keep producing even while offline. Producer income is multiplied by both with Trading Post bonus "Production Bonus Resources" and by the Power Plant Factory boost. The former will be factored in to the rate shown in the tab, but the latter will not, since it speeds up time itself.
Producers are a valuable source of resources throughout the game.
All of the following values are in resources/sec.
| Type | T1 |
T2 |
T3 |
T4 |
T5 |
|---|---|---|---|---|---|
| 0.25 | 150 | 3e5 | 2.5e12 | 1e20 | |
| 0.02 | 10 | 2.75e4 | 1.5625e10 | 1.25e18 | |
| 1.04167e11 | 8.3333e18 | ||||
| 8.3333e10 | 6.6667e18 | ||||
| 1.6667e10 | 1.3333e18 | ||||
| 1.25e8 | 1e16 | ||||
| 3.125e10 | 2.5e18 | ||||
| 1.25e8 | 1e16 | ||||
| 2.0833e9 | 1.6667e17 | ||||
| 2.5e11 | 2e19 | ||||
| 2.8333e8 | 2.2222e16 | ||||
| 2.0833e11 | 1.6667e19 | ||||
| 5e7 | 4e15 | ||||
| 1000 | |||||
| 0.001 | |||||
Shop
The shop is where you can buy materials and items with red cubes, without having to make them.
The items in the shop however have a stock limit, that replenishes over time when not capped. Shift clicking buys five at a time, and right clicking buys the entire stock at once.
Refining
The refining tab is where you refine shards dug up from the mine into ores. To refine, you must select which shards will participate (generally, you want all of them) and their proportion (equal splits equally, while relative splits according to how many shards you have).
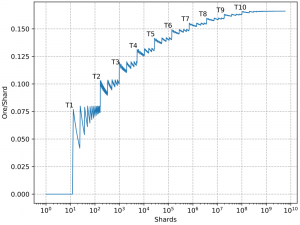
This allows you to get higher tier items than can be found in the shop. In order to refine a particular tier of ore, you must refine with at least that many different shard types, and the total size of the refine must exceed a certain "breakpoint" threshold. It is generally suggested to not refine larger than the threshold for a given tier, because it just wastes time and shards (see chart). The breakpoints are as follows (round up to the nearest integer, the fractions are for data completeness):
| Tier | Size |
|---|---|
| T1 | 12.5 |
| T2 | 164.157987753 |
| T3 | 981.805656071 |
| T4 | 5223.76200109 |
| T5 | 26919.6914918 |
| T6 | 137812.5 |
| T7 | 707792.640311 |
| T8 | 3662530.24793 |
| T9 | 19131554.9974 |
| T10 | 100964071.569 |
The belt is very important in reducing the time it takes to refine material. It is much faster to refine only what is needed to build the next level belt, start a new refine for one tier higher, and repeat, then it is to go straight for T10 ore with a low-level belt.
It takes 2 seconds to refine 1 shard without any belt, skills, or other effects. To calculate the total time to refine including all those effects, see https://www.desmos.com/calculator/snqbg6250j.
Second Floor
Main Article: Factory Floor 2
The Second Floor of the Factory involves mainly using mass to create items, automate crafting, and growing materials from trees.
Crafter
The Crafter is used to scan items and craft scanned items automatically, allowing you to easily craft them.
To scan an item, you need to have a certain quantity of it (the items are consumed in the scanning process), and to have all ingredients needed to craft the item already scanned (Ores and rubber are the first items you can scan). Scanning an item will also cost Factory Resources, which varies depending on the tier of the item. The resource cost for each tier is as follows:
| Tier | Resource Cost | Quantity |
|---|---|---|
| T1 | 100B | 100 |
| T2 | 100T | 50 |
| T3 | 100Qa | 30 |
| T4 | 100Qi | 25 |
| T5 | 100Sx | 20 |
| T6 | 100Sp | 15 |
| T7 | 100Oc | 10 |
| T8 | 100No | 10 |
| T9 | 100De | 10 |
| T10 | 100UDe | 5 |
By default, the crafter will automatically craft all items required to make the requested items, recursively. You can also toggle the crafter to use any relevant items already in your inventory.
Fabricator
The Fabricator is used to create items out of mass. After the second floor is unlocked, all factory items will display their mass. Their mass represents how much mass you gain from dissolving them. Their mass is also directly proportional to the resources used to make them. (With the exception of ore to ingot. Always turn your ores to dust first or don't directly turn ores to ingots, as they will lose 50% of their worth from doing so.)
After you have scanned a item in the crafter, you can dissolve that item for mass. The mass is stored and can be used to fabricate any scanned item. The fabricator also contains an auto-mass producer, which makes mass passively. However, it is slow for how expensive it is. The fabricator can be upgrade to increase dissolve speed, increase fabricating speed, increase maximum amount of mass, and increase auto-mass production.
Tree Farm
The Tree Farm is used to grow items. The player can plant saplings, which will grow into trees over time. The more time the tree grows, the faster it will produce. Currently, the only type of sapling is Rubber Saplings, which produces rubber.
Skills
- See also: Skills (Upgrade)
- Faster Machines - Increases the production speed of all machines by 50%.
- Full Capacity - Increases the resource production by 2% for each unique item type inside the production grid.
- Infinite Rubber - Doubles the stock limit of all shop items and halves the refill time. Also the refill time of rubber changes to 0.1 sec. per item.
- Auto-Fill - Allows you to automatically fill the contents of the crafting grid with the requirements of the selected recipe.
- More Ores - Doubles ore output from shard refining.
- Advanced Refining - Reduces the basic refining time per shard from 5 seconds to 2 seconds.
Exotic Skills
- See also: Exotic Skills
- Machine Handling - Allows you to pick up machines from their machine slot via right click and place them back via left click.
- Chemical Lumps - Changes the recipe for ore lumps to only use 4 dust of the previous tier.
- Battle Producers - Increases the production of all producers by 1% for each second that passes during an active tower run. Resets upon quitting or restarting. Does not affect exotic producers.


